
Additional Coverage Features in CDash
Branch Coverage with GCov
CDash now understands C/C++ branch coverage information generated by gcov or llvm-cov. As opposed to line-by-line coverage, branch coverage shows you how many possible code execution paths were taken.
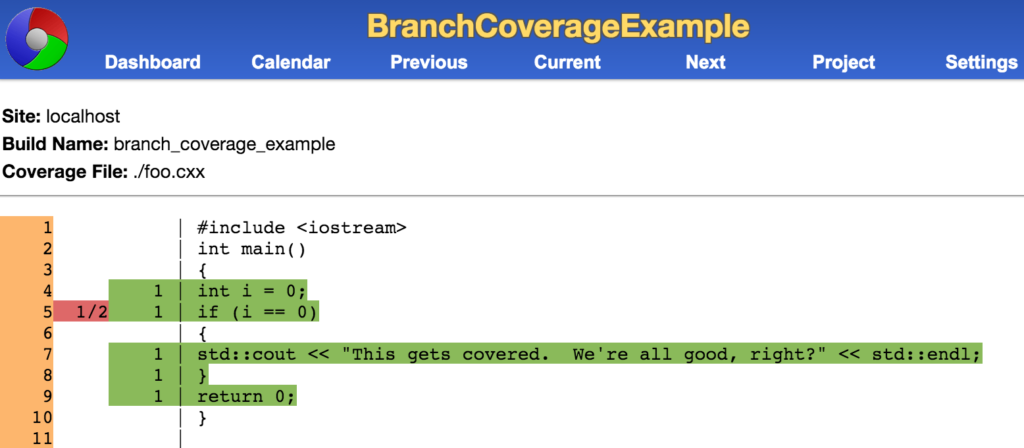
In this simple example, every line of code was executed, but we can see that one (implicit) branch was not: the case where i != 0.
To run this example, download this tarball, unpack it, and execute the following command:
ctest -VV -S run_example.cmake
This example assumes that you have a CDash server running on localhost, and that it contains a project named BranchCoverageExample. You can change these settings by editing src/CTestConfig.cmake.
Grouped SubProject Coverage
CDash allows you to organize your Project into SubProjects. A more recently added feature is the ability to further organize your SubProjects into groups. While this capability may be expanded in the future, the primary purpose behind it so far is:
- To summarize coverage results by group.
- The ability to set different coverage thresholds per group.
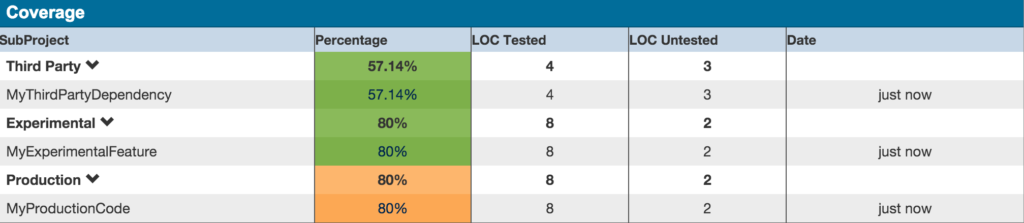
In this example, the Production group has a higher coverage threshold than either Experimental or Third Party. So despite the fact that MyProductionCode has the highest coverage percentage, CDash draws its row using the warning color rather than the success color used for the other two rows.
Here’s how to recreate this example on your local CDash server.
Download the example tarball and unpack it.
Create a project in CDash called SubProjectExample.
Setup the SubProjects and their groups. You can do this by running ctest -VV -S create_subprojects.cmake . This submits the Project.xml file to CDash, which contains information about the SubProjects, their groups, and dependencies.
Setup the coverage threshold values. Make sure you’re logged in as a CDash administrator. Then select the SubProjects option in the Settings drop-down menu.
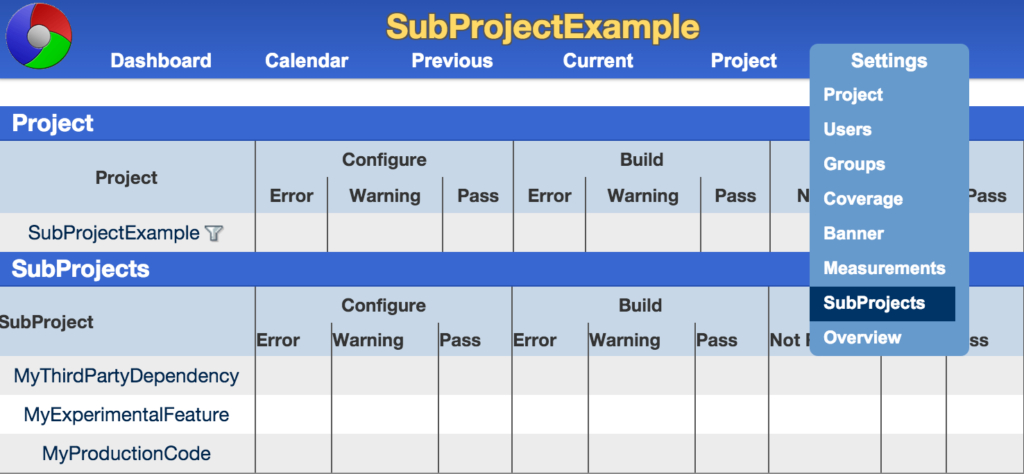
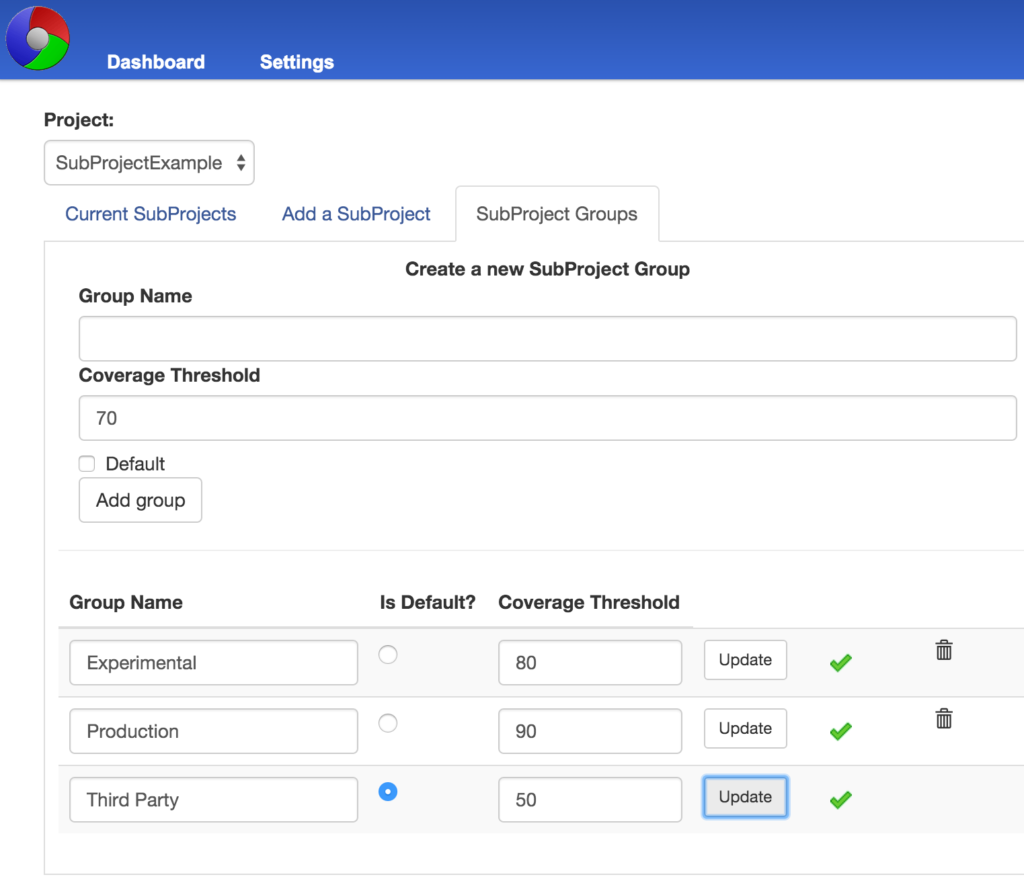
This takes you to manageSubProject.php. Here, click on the SubProject Groups pane. This section of the page allows you to set different coverage threshold values for each group.
Once your thresholds are set, you can run ctest -VV -S run_examples.cmake to perform the SubProject example locally and submit its results to your CDash server.
Java Coverage with EMMA
You have a couple options if you’re interested in display Java coverage on CDash.
CTest natively supports JaCoCo. If you have a choice of which tool to use, this is probably the easiest way to go. All you need to do is call ctest_coverage after your tests have run, and then ctest_submit to upload the results to CDash.
CDash has also been taught to understand coverage output from EMMA. This may be useful to you if you use ant to build your project, as EMMA is the default coverage tool used by ant.
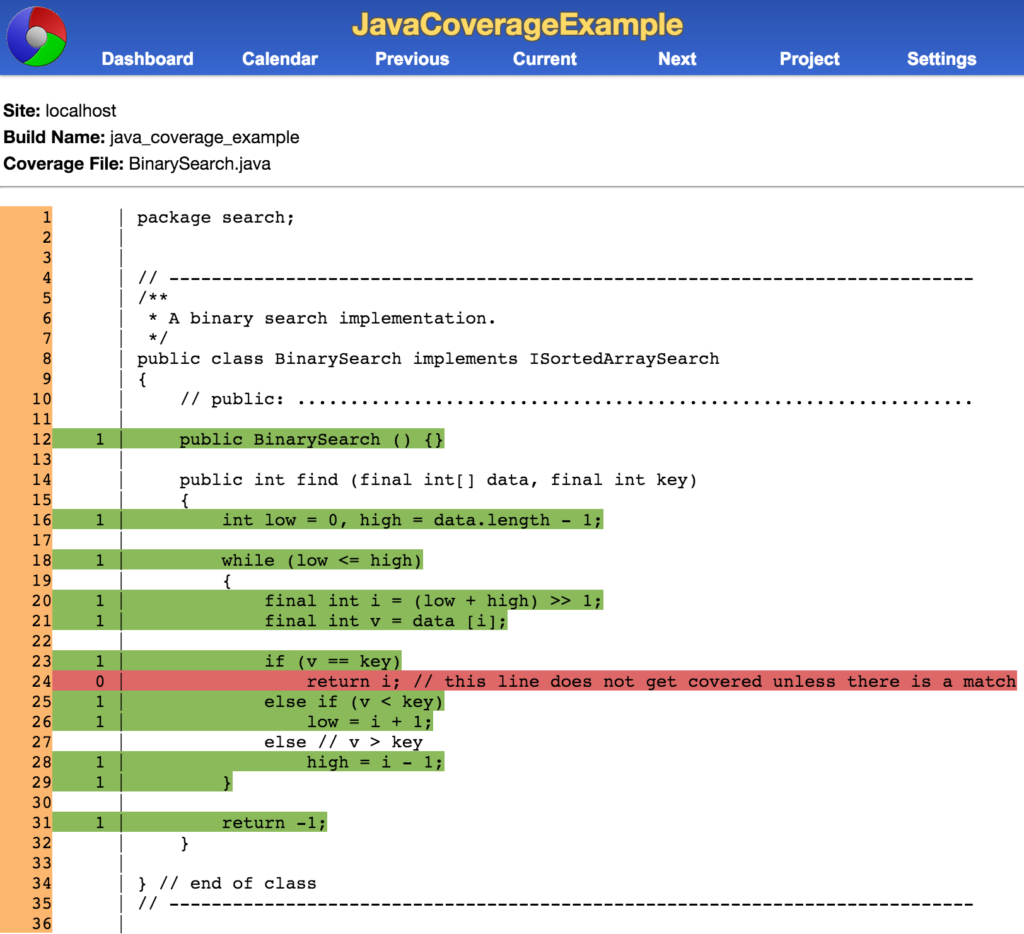
To run this example, download the tarball, extract it, and run
ctest -VV -S run_example.cmake
This example assumes that you have a CDash server running on localhost, and that it contains a project named JavaCoverageExample. You can change these settings by editing src/CTestConfig.cmake.
In order to receive line-by-line coverage information from EMMA we had to modify one of its classes to output this data in JSON format. This modified version of ReportGenerator.java, as well as a precompiled JAR file, are included in this example under the src/lib directory.
JavaScript Coverage with JSCover
JSCover is one of the more recent additions to the XML Handler capability of CDash. This coverage tool focuses on the coverage of Javascript code that is found as part of a web-served program.
There are a few modes of running the JSCover tool, but the recommended way of gathering the data involved the “FileSystem” mode. The “FileSystem” mode generates a second copy of a given directory while adding arrays and functions to each of the Javascript files it copies. These arrays are used to maintain the count of execution for each line while the functions are used to summarize the data. The instrumenting of a repository is done via a command line invocation of a Java program:
$ java -jar ~/jscover/bin/JSCover-all.jar -fs -h
 Usage: java -jar JSCover-all.jar -fs [OPTION]... SOURCE-DIRECTORY DESTINATION-DIRECTORY
 Instrument JavaScript with code coverage information.

 Options:
       --js-version=VERSION  use the specified JavaScript version
       --no-instrument=PATH  copy but do not instrument PATH
       --exclude=PATH        don't copy from source/PATH
       --branch              collect branch coverage data
   -h, --help                display this help and exit
There are some additional options for the filesystem mode.no-instrument copies the files to the new directory but does not instrument the files which is good for files that are used but are not to be included in the coverage calculations. The other option is the exclude which does not copy the files from the source directory at all. It also has the capability to track branch coverage, however, the parser is not written to account for the branch coverage option at this point. The most simple version of the command is shown below for an example set of directories:
/usr/bin/local/java -jar ~/jscover/target/dist/JSCover-all.jar -fs ~/demoProject/ ~/demoProject_instrumented/
After the “instrumenting” of the files, they can be served on the web and the testing can begin. The interactions with the web page are not restricted to be manual or required to use Selenium or a similar program. Once the desired interactions have happened on each page, the next step is to capture the data to the local disk. jscover_serializeCoverageToJSON is a function found in a generated JavaScript file which is used to summarize the information found in the arrays and write out that information as JSON. So far, this JSON text has been saved to a “blob” object and then that blob will eventually be saved. This will require the addition of some buttons and JavaScript functions to the pages of the project. One button to run a Javascript function to serialize the data and save it to a blob object while the other saves the blob to the local disk.
Once the file has been saved, the next step is to collect the information and submit it to the CDash instance. The xml_handler capability of CDash expects that the submitted information will be in the form of a tar file which contains a collection of JSON files. There exists a helper function to do this collecting for you, called CTestCoverageCollectJSCover.cmake. This file searches through the binary directory of the build tree and adds all .json files it encounters to the output .tar file. Finally, the tar file is uploaded to the CDash instance using the “CDASH_UPLOAD” signature of the ctest_submit function. The :CDASH_UPLOAD_TYPE” should be set to JSCoverTar to enable the correct xml_handler.
ctest_submit(CDASH_UPLOAD “${CTEST_BINARY_DIRECTORY}/vivianCov.tar” CDASH_UPLOAD_TYPE “JSCoverTar”)
We have provided a simple download to demonstrate this which contains one Javascript file, one HTML file, and the auxiliary files needed to submit to a CDash instance. As in the above example, the submission can be generated by running ctest -VV -S run_example.cmake. This script will perform the collecting and saving of the JSON files found in the current directory. For those with web hosting capabilities, the directory can be hosted and the webpage can demonstrate all of the above functionality and additional JSON files can be downloaded and added to the directory to be picked up by the run_example.cmake file.