SlicerCAT and Python: Creating Custom Slicer Applications with Qt Stylesheets


What is SlicerCAT?
Our previous blog post on the Slicer Custom App Template (SlicerCAT) explained how to build a custom application based on 3D Slicer with CMake. In this follow-up blog, we present a framework for creating a custom Python scripted module with Qt stylesheets. Scripted modules and stylesheets are core components of modern Slicer that make customization easier than ever.
What is 3D Slicer?
3D Slicer is a software platform for the analysis and visualization of medical images and for research in image-guided therapy. It is free, open source, and cross-platform (Windows, macOS, and Linux). The Slicer community maintains more than 180 extensions providing algorithms and tailored workflows for quantitative imaging research in brain tumors, prostate cancer, and lung cancer, among others.
Why customize?
Developers may want to create a custom 3D Slicer based application for a variety of reasons, including:
- Creating a streamlined and simplified UI for specific workflows
- Bundling frequently used extensions into an installer for an institution or organization
- Developing an application including custom or proprietary algorithms. To learn about use for commercial projects, see the License section.
SlicerCustomAppTemplate
The SlicerCustomAppTemplate is a customization wrapper around the core of the 3D Slicer application. It allows developers to customize Slicer including adding application branding, custom code, and modules. You can download and configure the template from the Python command line:
pip install cookiecutter jinja2-github
cookiecutter gh:KitwareMedical/SlicerCustomAppTemplate
Instructions on building the initial template can be found in Slicer documentation and in the 2019 SlicerCAT blog. The code used to generate the Slicer application in the figures below can be found at https://github.com/KitwareMedical/SlicerCAT.
The Home Module
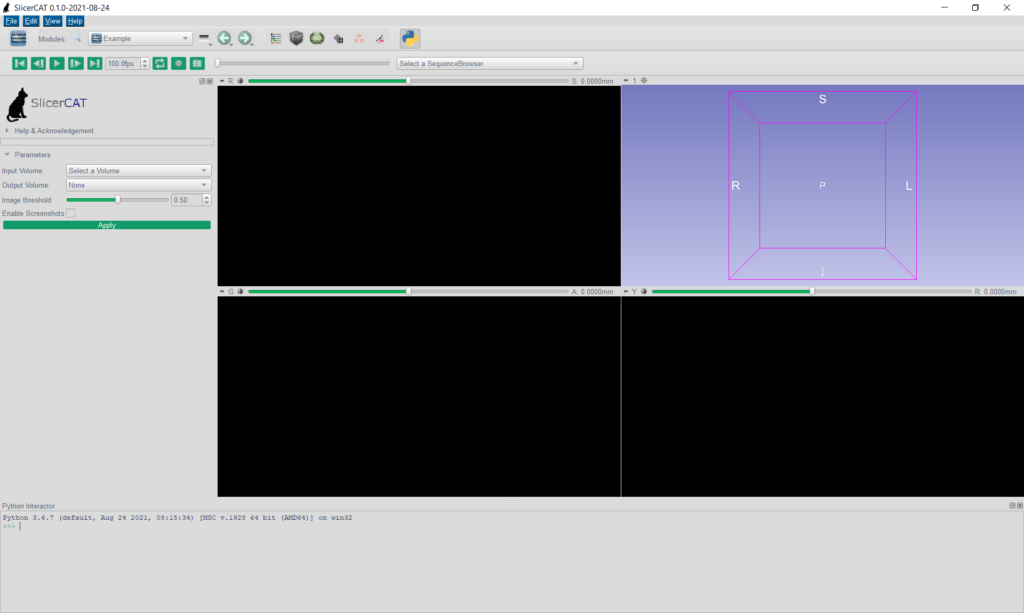
Slicer initializes a “Home” module that appears by default when the application is started. The custom application generated by SlicerCustomAppTemplate uses the appropriately-named Python scripted module “Home”, while SlicerCAT uses an “Example” scripted module as its Home module. We will reference the “Example” module to explore Python customization options. For more information on developing new scripted modules please visit https://www.slicer.org/wiki/Documentation/Nightly/Developers/Modules.
Python code controlling the behavior and appearance of Qt widgets is found in the “Example.py” script in the SlicerCAT source code. Custom behavior can be easily introduced by altering Python code in this file.
There are many Python functions available to modify the user interface from the Python setup script. Documentation for the `slicer.util` module provides a wide variety of functions for controlling widget properties and performing common operations. The Python scripting repository also contains useful scripts that can be copied and pasted into your own code. To demonstrate, we will walk through the creation of a simple toolbar button for controlling application appearance.
Step 1: Add Custom Resources
Resources for a module may include media such as a thumbnail image or data such as a QSS stylesheet. The “ExampleLib/Example.qrc” Qt Resources file includes the “Restyle.png” thumbnail and “slicerorg.qss” stylesheet and is in turn included in “CMakeLists.txt” to be built with the Slicer custom application. The “ExampleLib” folder defines a Python module that we can include in our script for accessing Qt resources.
It is often useful to leverage Qt stylesheets to set the appearance of many UI components at once. QSS is the Qt stylesheet syntax markup language. Custom QSS can define a new style or mimic styling from CSS sources, such as the slicer.org CSS stylesheet. “slicerorg.qss” implements a new default widget background color and adds custom button styling to resemble the Slicer.org webpage (as of 2021).
QWidget{color:#576071;
	background-color: #dbdbdb;
	font-family: "Helvetica","Arial"}
QPushButton { background-color: #129A68;
	color: #FFFFFF;
	border: 2px solid #dbdbdb;
	border-radius:4px}
QPushButton:hover { background-color: #dbdbdb;
	color: #129A68;
	border-radius:4px}
The contents of the Qt stylesheet file slicerorg.qss.
Step 2: Add Custom Widget
The Python Scripted module calls `slicer.util` to insert a new toolbar and add a single button with the custom icon. This button will be used to toggle the application style.
First, we import the necessary libraries in our module. This includes the “ExampleLib” module that we define to reference our Qt resources. In Example.py:
import os
import unittest
import vtk, qt, ctk, slicer
from slicer.ScriptedLoadableModule import *
import logging

from ExampleLib import ExampleResources as Resources
Next, we implement the `modifyWindowUI` function to add a toolbar with a custom button to the Slicer main window. `slicer.util` is referenced to find existing elements of the Slicer application. We make use of the Qt resource path notation “:/<path>” to reference the icon resource that we previously added to our “Example.qrc” file.
class ExampleWidget(ScriptedLoadableModuleWidget):
  ...
  def modifyWindowUI(self):
    mainToolBar = slicer.util.findChild(slicer.util.mainWindow(), 'MainToolBar')


    self.CustomToolBar = qt.QToolBar("CustomToolBar")
    self.CustomToolBar.name = "CustomToolBar"
    slicer.util.mainWindow().insertToolBar(mainToolBar, self.CustomToolBar)

    moduleIcon = qt.QIcon(":/Icons/Restyle.png")
    self.StyleAction = self.CustomToolBar.addAction(moduleIcon, "")
Finally, we modify the `setup` function in our scripted module to call the `modifyWindowUI` function when the module is loaded.
class ExampleWidget(ScriptedLoadableModuleWidget):
  """Uses ScriptedLoadableModuleWidget base class, available at:
  https://github.com/Slicer/Slicer/blob/master/Base/Python/slicer/ScriptedLoadableModule.py
  """

  def setup(self):
    ScriptedLoadableModuleWidget.setup(self)

    # Instantiate and connect widgets ...

    # Custom toolbar for applying style
    self.modifyWindowUI()

    ...
Step 3: Add Custom Behavior
Once the custom QSS stylesheet is added to the QRC Resources file, it can be referenced at runtime. Behavior to toggle Slicer styling with a button press is added in just a few lines of code.
We define the “customQssEnabled” variable in the Example.py module to track whether custom styling is currently applied.
class ExampleWidget(ScriptedLoadableModuleWidget):
  """Uses ScriptedLoadableModuleWidget base class, available at:
  https://github.com/Slicer/Slicer/blob/master/Base/Python/slicer/ScriptedLoadableModule.py
  """

  customQssEnabled = False

  def setup(self):
We then implement a new function to access the custom Qt stylesheet and apply the styling to each widget in the Slicer application. If custom styling is currently applied then application styling is set back to default. Note that the QSS file was not included in our Qt resource file and is accessed here with “self.resourcePath.”
class ExampleWidget(ScriptedLoadableModuleWidget):
  ...
  def toggleStyle(self):
    if self.customQssEnabled:
      with open(self.resourcePath("slicerorg.qss"),"r") as fh:
        style = fh.read()
        for widget in [slicer.app]:
          widget.styleSheet = style
    else:
      slicer.app.styleSheet = ''
    self.customQssEnabled = not self.customQssEnabled
Finally, we connect the “toggleStyle” function to our custom button to drive behavior.
class ExampleWidget(ScriptedLoadableModuleWidget):
  ...
  def modifyWindowUI(self):
    ...
    moduleIcon = qt.QIcon(":/Icons/Restyle.png")
    self.StyleAction = self.CustomToolBar.addAction(moduleIcon, "")
    self.StyleAction.triggered.connect(self.toggleStyle)
Now we can rebuild the application and view our results.

The StyleTester module is available in the Slicer Sandbox extension for ease of access in testing different application stylings.
License
The SlicerCustomAppTemplate is distributed under the Apache license, while Slicer itself is distributed under the BSD-style Slicer License. Both are permissive licenses that support unrestricted commercial use, with attributions. Any custom code added to a Slicer custom application can be licensed however the developer wishes.
Summary
This demo presents an overview of how developers can use Python to create custom user interface elements and stylings for their custom applications based on 3D Slicer. Qt resource files and stylesheets streamline the customization process, while the `slicer.util` module and accompanying scripts are useful for implementing custom elements and behavior in a Python scripted module.
At Kitware, we use SlicerCAT and other tools to build a streamlined and simplified UI for specific workflows and customized applications with custom proprietary algorithms for our customers. Contact us at kitware@kitware.com to learn how we can help you customize and integrate 3DSlicer-based software into your research, processes, and products.